If you just go for a paddle than you can stop thinking about wanting to go for a paddle.

Tuesday, September 27, 2011

2011: Post 42 – Continuing onward with the Disko Bay

Continued from previous post number 41..........
The butt joints in the chines and gunwales had 24 hours to cure.  So tonight I decided to put the frames and stringers together with tie-down straps to see the rough shape of my kayak...
Looking toward the stern

The gunwale butt joints will be just in front of the masik frame
(i.e just in front of the cockpit) and the joints in the chine
will sit behind the cockpit 
With the stringers tied to the frames I was able to cut the extra length off after deciding the locations of the joints. 
I had not joined the keel pieces but with the kayak frame laid out like it was I was able to figure out the rough length needed for the keel, decide where the join will be, and cut one of the 10 foot pieces so as to have a more managable length.  I removed the keel pieces and set them aside.  Then I decided to leave everything together and hung it from the floor joists so it is out of the way.
Frame hung from the ceiling (less the keel)
I then joined the pieces of the keel with a butt joint...
The joint in the keel strip will likely sit just in front of frame five
but once I figure out the shape of the bow stem it may end
up behind frame five.
I have to admit that after tying the frames and stringers together and seeing the shape of the kayak take form I am feeling a sense of accomplishment in this early stage of this project... 

Sunday, September 25, 2011

2011: Post 41 – Some quenching of the Disko Fever

Continued from previous post number 38..........

Last weekend I made a trip to Home Depot to see if I could find some suitable pieces of cedar to use for stringers for my Disko bay SOF kayak.  After more than an hour of picking through the piles I found some pretty decent pieces that did not have many knots. I picked out a piece of 2x4x10 ft long to use for the gunwales and floor boards.  Then picked out one piece of 1-1/4x6 x 10 ft long to use for the chines, keel, and deck boards; this piece had very few knots and the ones it had were small.  For good measure I also picked up a piece of 1-1/4x6 x 8 ft long in case the 10 ft piece did not yield what I thought it might.

I had previously lined up Sean to rip my stringers for me.  Thanks Sean, but I was talking to my niece’s husband, Todd, who offered to rip my cedar for me on his table saw.  So yesterday I went to my nieces and in a very short amount of time Todd had cut my cedar for me.

Turned out the pieces I picked out worked out very well.  I sized everything up after the two ten foot pieces were ripped and it looked like I could get everything I needed out of them.  So I kept the 8 foot piece intact and brought it back home.  If I have not sized things up right I will just use it as needed and if I have figured things up right it will come in handy to use to make a laminated Greenland Paddle later.

Last night I laid out all the pieces of cedar and sized things up better with a measuring tape.  I decided which pieces to join for the stringers and marked them.


I had thought about scarfing the pieces together to make the lengths needed for the stringers but then decided against it.  I did some reading on the internet about scarfing and decided it was a lot easier (for me) to just butt join the pieces together.   Most things I read suggested using a 6 inch length of wood for the join, epoxy, and stainless steel screws or dowels.  I have a bottle of Gorilla glue on hand and decided to use that and I opted to use 8 inch lengths of wood for the join.


I have also been thinking that I may just lash the stringers to the frames.  I have been reading that this is quite sufficient (if done correctly) and that adding screws or dowels through the stringers into the frames is just adding bells and whistles.  Once everything is lashed than I will decide if I will add screws or dowels.  I have been thinking that if I decide to just go with the lashing I can put some lashing around the butt joins for extra strength; but I am thinking at the very least I will end up adding screws to the butt joints.  But all of that can be decided before the polyester skin goes on.

Speaking of polyester… I ordered some today from Kudzu Crafts along with a spool of 50# artificial sinew and a backband.  I expect I could make up a backband or back support but it was only $27.00 and it did not add anything to the cost of shipping.  While I am waiting for this stuff to show up I will pick away at things.   I have to make a strongback and secure frames one and six to it.  Then I can temporarily tie the stringers on and cut them to proper length.

Well, that’s a little more accomplished... actually it feels like a lot more accomplished.  I am now viewing this as a full blown project and not just an idea I have been toying with…

Saturday, September 17, 2011

2011: Post 40 – How to solve a problem like Hurricane Maria

Hurricane Maria came through Newfoundland yesterday.  We figured the day after would not be fit for paddling but it would produce some fun at St. Philips.  The weather channel was calling for 55 km westerly wind, gusting to 70 km, for the morning.  So myself and Tony met before 10 am this morning and hit the water.

I took a bunch of pictures but since Tony was the only one there, other than myself, this blog entry will seem like a 'Homage to Tony'... Well, if he is the only one that would come along this morning than perhaps he deserves one... Yee haw, buddy!!


After our fun, while we were packing up our gear, three older ladies came over to us and told us how concerned they were for us out there.  They had been watching us and became worried when they lost site of us (I think we had paddled back in at that point) and so they all walked down to check on us.  I asked if they had planned to swim out to save us... They laughed, but they were not sure what they were gonna do, but I guess they felt they needed to see if we were okay.  It was very sweet of them, but kind of funny...

Wednesday, September 14, 2011

2011: Post 39 – A moonlight paddle

Last night the conditions were right for a moonlight paddle from St. Philips to Topsail Beach.  A healthy crew of ten paddlers showed up for the paddle but the main attraction - the moon - decided to not partake; it stayed hidden behind a cover of cloud.  But moon or not, we were intent on paddling...

I have paddled in the dark several times in the past and I have paddled from St. Philips to Topsail Beach many times, but for me paddling it at night was a first.  We had a good bit of fun and it was good to see a few paddlers show up that I have not paddled with, or even seen, for a while.

It's hard to get good pictures in the dark.  But here are some of the ones I took...


Stan

Sue

The last of the sun

Derrick and Gerard
Tony
Gary

Sean

Hazen

Gerard

Brian
I think it was about 10:30 pm when we got off the water... maybe just a little too late for some paddlers....


Thanks to all who showed up for this paddle.  It was great to see those of you that I have not paddled with for a while, and just as great to see those of you whom I paddle with on a frequent basis.

Sunday, September 11, 2011

2011: Post 38 – Disko Fever

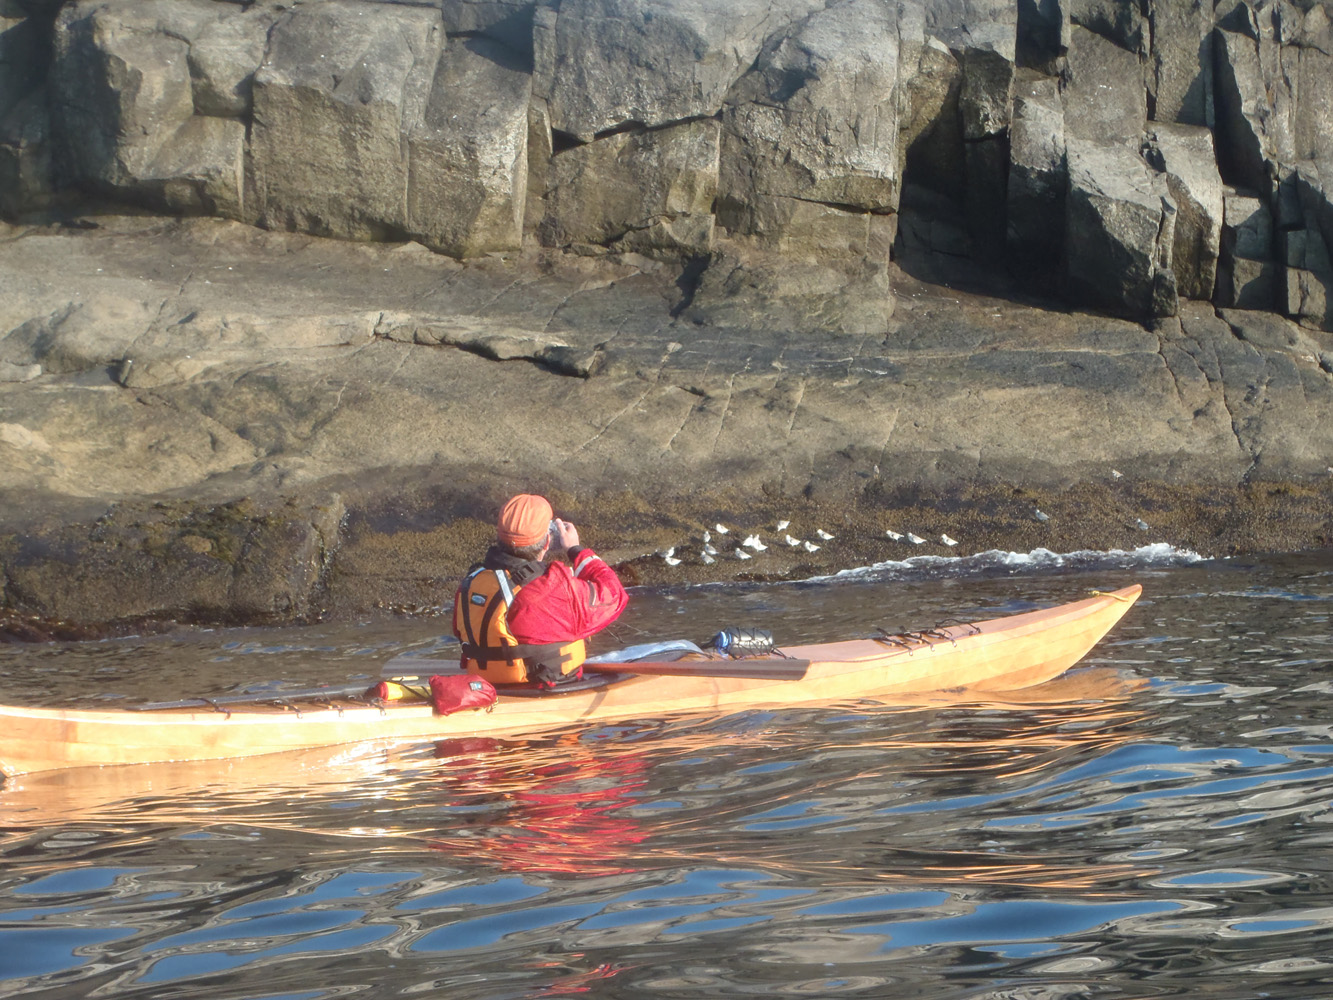
Sean finished his modern replica of his 1931 Disko Bay skin-on-frame kayak, except for the deck rigging, and brought it to last week’s Thursday practice.  Sweeeet!  Be sure to check out his blog.  He has some nice shots of it during and after he took it out of his house.

Since he started the build a few months ago I have been interested in the possibility of trying my hand at building one of my own.  I e-mailed Dave Gentry for the plans for it and started to figure out how to make one.  I e-mailed Dave with some questions, looked at some websites, and have been asking Sean a bunch of how-to questions while he has been building his.  I think I have mostly figured it out in my mind and have been thinking it would be a good winter project... something to pick away at in free time on cold nights.

At the end of Thursday practice Sean let me sit in his new kayak and it felt pretty nice.  A little bit of Disko fever set in…

I figured it was time to make a start and at least get the plywood frames cut out.  Shortly after I received the plans with the offsets from Dave I figured drawing the frames out on plywood was time consuming.  I have access to computer drawing software and so a while ago I had drawn up the frames had plotted them out full size. I picked up a sheet of bristol board and glued the paper frames to it.   Then I cut out the frame templates that I could use to trace around onto plywood. 

Gluing the paper frames onto the bristol board


All six frames glued to the bristol board and cut out
(the bristol board provides a raised edge to easily trace around)

I had intended to paddle today but then decided not to.   I picked up a piece of 17.5 mm thick Russian Birch plywood (as recommended by Sean) just before Home Depot closed last night and traced out the frames with my templates. 

Frame five just happened to fit inside the masik
so there was a little less wastage

The sheet of plywood is 24x48 inches and, because frame five fit inside frame three, I was able to fit all six frames onto half the sheet, with the sheet cut diagonally… Not sure what to do with this half-sheet… maybe Sean will make another one, and Tony thinks he may built one too…

I placed the templates around the plywood edges to reduce the
amount of cutting along the straight edges

All the templates traced out, with some
of the straight cuts done by handsaw

Before suppertime came around I had all the frames cut out, with the exception of the notches for the foredeck in frames two and three… these can easily be done later.  The rough edges can be sanded out after the kayak is completely framed; except for frame three and four, you will not see the frames so required sanding is minimal.  I know I will still have some adjusting of the notches to get a good fit for the chine and keel stringers.


I expect this project is a big undertaking for me as I am limited in tools, space, and know-how, and it will therefore go slow.  But I am not in a big hurry so I will take my time and try to do it right.  At least now I have made a start. 

Monday, September 5, 2011

2011: Post 37 – Flatrock to Outer Cove

Yesterday afternoon a small group of us left Flatrock.  Our plan was to follow the shore and paddle as far as Outer Cove.  There are a lot of caves in the area and when the conditions are right you can check out every one of then, and the conditions were right for our afternoon paddle.  


The put-in at Flatrock

Today's participants:


Tony

Paul
Ysabelle

Neil


Some pictures of the paddle along the way....

Ysabelle

Neil

Paul heading into one of the many caves.
I like how this pic is divided by light and dark...

...the shadow kayaker
There is an eagle in the middle of this pic
(my camera couldn't zoom in any closer)

Neil, a very experienced paddler, enjoying some playtime...

Neil and Ysabelle at Middle Cove

Young boys playing in the ocean at Middle Cove...

Break time at Middle Cove

Tony let this young boy sit in his kayak...
of course his sister had to have a turn too.

I did not know I took this pic until I reviewed my shots at home,
but it is kind of interesting though...

Tony making his way back across Tor Bay in the evening sun.

Paul, Neil, and Ysabelle

There was some increased swell on our way back...

Neil finding something interesting to take a picture of...

The days paddle done.

This was an excellent paddle.  It is so close to home and provides hours of relaxed paddling and many caves to check out.  But you have to mind the weather and sea state.  You have to pick your day to be able to check out those caves and Neil picked a perfect day for it.  Thanks Neil and Ysabelle for the invitation to go on this paddle.