If you just go for a paddle than you can stop thinking about wanting to go for a paddle.

Monday, August 25, 2014

2014: Post 28 – Paddling under the weather

I awoke Sunday morning, still not feeling overly well, but the low-grade fever I had the night before was gone.  I got myself a cup of tea to soothe my sore throat.  The guys would be meeting at Bauline in less than two hours.  I sat at the kitchen table thinking I should eat some breakfast, but just couldn't stomach anything other than my tea, and a couple of Advil.

After I finished my tea I went down into the basement and had another look at my neck gasket replacement (see previous post). Then I went outside to see what kind of day it was; not much wind, nor cold either.  I went out back to the shed where I heard a whisper, "the fresh air will do us some good."  In my mind I said "Okay Jenny, you talked me into it... we'll go for a paddle..."  Besides, it would be a good day to try out my all-cedar paddle that I had made last fall, but only got around to finishing it with Corey's Amazing Tung Oil a couple weeks ago...


So I secured my kayak to the roof rack, went into the house and threw my gear together, jumped in the car, and headed off to Bauline to meet the guys...

--------

The plan was to leave a car in Bauline and drive to Pouch Cove for the put-in.  Tony has already done his blog entry on the paddle so there is not much to add... click here for his take on the day.  I had done this paddle back in 2011, but we went from Bauline to Pouch Cove... click here for my entry on that day.

Here are a few of my pictures, and a video, to share...

The put-in at Pouch Cove
Carrying Des's kayak down the slipway

Des was the first to seal launch, then I went

I waited at the bottom of the slipway with camera in hand,
just in case there was an undesirable event.  But Tony
did a very neat  job launching without any help.   


Des and Tony underway

The swell landing on Biscayan Islands

Cape St. Francis

Tony trying to hide from my camera

Tony and I like to paddle closer to shore....

... but Des seems to prefer to paddle farther out.

A few kilometres from Bauline we came upon a little cove.  I needed to pee and decided to jump out.  Tony waited, keeping an eye on Des farther down the shore.  I thought I had my kayak pulled up far enough, but just as I was finishing my business I heard a swoosh of water and when I turned around my kayak was being sucked out into the cove.  I made a tentative dash for it over the rocks and very nearly had my hand on the bow, but then it was gone out my reach.  If I had my relief zipper closed I would have made a jump for it.  So instead I called out to Tony to come and retrieve Jenny for me. 

The real funny part is that I was on shore taking pictures of Jenny floating away from me and Tony was in his kayak taking pictures of the captain-less kayak before getting her for me.  We joked about how the priority with us seems to be to first get pictorial evidence for the blog of such events, and then spring into action to rectify a situation...

Tony coming to save Jenny

Tony just before we reached Bauline

Des was already on the slipway when
we pulled in to the little harbour

All hands safe and sound 

It was a fun day that provided some more good kayaking memories.  I still have my sore throat today, but Jenny was absolutely right... the fresh air yesterday did do us some good. 


Sunday, August 24, 2014

2014: Post 27 – My first drysuit gasket replacement

After last weeks Thursday practice, while taking off my drysuit, I split the neck gasket!!  In more than five years of wearing drysuits, I have not had to replace a gasket.  I contemplated bringing the suit to the local outfitters to get a new one installed, or maybe pick up a gasket and get one of my paddling buddies to do it for me.  

Then on Friday night I searched the internet and found a bunch of how-to-videos showing how to do the gasket replacement yourself.  It didn't look too difficult and I figured that if I could only find something that was the right diameter around the house I could try to do the job myself. The worse thing that would happen is that I would muck it up and then I would just take it to someone who could do it properly.

I tried several items to find something that would fit in the neck of the drysuit... a basketball, a paint can, a pail.. all no good.  Then it dawned on me that the cooking posts in the house were of various sizes so I started looking at those.  I found one that looked to be fairly new and it seemed to fit just right... 

On Saturday morning I went to the local outfitters when they opened and picked up a gasket and a tube of Aquaseal.

I wrapped the pot with wide, clear tape so as not to get Aquaseal all over it...


I read the instructions that came with the gasket and set to work. Yes, I am one of those guys that will read instructions.  Now I don't always follow the instructions exactly, but I will (almost) always read them.  But no, I almost never ask for directions.  But anyway...

I cut away the old gasket with with a pair of scissors, leaving about an inch of it on the drysuit... 


Then I dry-fitted everything.  I put an elastic band over the new gasket and then peeled it up to expose the shiny side of the new gasket...


Next, I buffed the latex of the old gasket with a bit of sandpaper and then put a  layer of Aquaseal on both the old and the new latex where they would meet...


Although the instructions said you did not have to unless you are using cotol, I let the Aquaseal get a bit tacky for a few minutes before folding it down over the old gasket latex.  I added clear tape to keep everything in place, and added some extra elastic bands for good measure...


The instructions said the Aquaseal required eight to twelve hours to cure.  I let things sit for about eleven hours and decided the Aquaseal was dry enough.  So I removed the clear tape and elastics to have a look at the repair...


This side looked like a pretty clean job...

... but this side looked a bit 'goopy'.

And the outside looked like it wasn't too bad of a job at all.

I hung my drysuit up to let the Aquaseal continue to cure overnight, although it did seem that it was fully cured at this point.  

Tony had proposed a paddle on Sunday morning...  I had been feeling under the weather all Saturday and figured not to be paddling on Sunday.  But if I did decide to paddle my neck gasket would be ready to go... 


Sunday, August 17, 2014

2014: Post 26 – The beaches of Brock Pond falls

Today we paddled up to Brock Pond Falls.  We usually take a run up there once or twice a year; we were there in April, but I did not have my camera so I will direct you to Tony's blog entry on that day... click here.

When we got to the falls we decided to take out for a break.  The beaches in the area are very beautiful, some of the best in our province.  I decided to be the last one off the water so I could shoot some video of the guys taking out...

Here's Tony doing a nice job of getting off the water...


Here are Greg, Brian, and Gary just a little farther down the beach...


And of course you have to get back on the water too...


Greg and I did the Level 2 Kayaking course together last year (click here for my first entry on the course and click here for the second entry).  After he was back on the water I said to him "...we didn't learn that on the course last year, did we?"  He chuckled...

Thanks guys for sharing the day.  It was all a good bit of fun. 

Also be sure to check out Tony's entry on today's paddle...


Saturday, August 16, 2014

2014: Post 25 – Avondale Kayak Night Paddle

Nine kayaks with ten people showed up last night for the club's yearly night paddle out of Avondale....  We had cloud cover, and very little bio-luminescence,.. but the wind was low making it an enjoyable and fun evening on the water.

A few pics to share....

Kayaks were unloaded...

Glow sticks were unwrapped...

A brand new drysuit was worn...

Gear was packed into hatches...

Paddling was started... 

Paddling was continued as darkness intensified... 

Shipwrecks were inspected...

On-water socializing occurred...

Big houses with many lights were checked out....

A fire on the beach was started...

Wieners were roasted...

Food was cooked up...


And finally the lights of Avondale came back into view.

Here's a shot of Alex and his wife, Cecilia...


Alex is the official leader of this yearly paddle, but I have a feeling he is merely just a figurehead.  Cecilia is ever present during these paddles and I think she is quietly leading the leader. 

Thanks to all those who showed up to make it a fun night.


Saturday, August 9, 2014

2014: Post 24 – Valley Kayak Seat Replacement

Before I ordered my Valley Nordkapp I knew that I would  inevitably have to replace or repair the seat that would come with it.   My good buddy Tony had to repair his (click here) and as I researched about Nordkapps on the internet I came upon blogs and u-tube videos of people who had to do repairs to their valley seats, or replaced them altogether.  

It appears to me that the problem with these particular seats is that they are made with ABS plastic and are 'hung' from the underside of the deck.  The foam that is glued to the underside of the seat is not sufficient to make a solid connection with the bottom of the cockpit and the underside of the seat.  When paddling, bracing, rolling, etc... the seat will flex and move, and the plastic will eventually fail at the points of greatest pressure. 

However, knowing there was a seat design flaw, I ordered up North Cape Jenny anyway...

Valley provides a one year warranty on their products, and Jenny was to be in my possession one year on June 4th of this year.  On the 17th of May I paddled.  When I returned home I put Jenny in the shed and noticed a crack on the starboard side of the seat!!  As expected, the Valley seat had failed, although I expected it to last longer.  


I removed the seat to have a closer look and discovered that there were cracks on both sides...


Starboard side

Port side
With the expectation that this seat would be replaced under warranty, I took pictures to e-mail to the local outfitters from whom I purchased the kayak.  In the meantime I got out my Gorilla tape and put on a couple layers in hopes that this would temporarily hold things together...


While putting on the tape I noticed a line at the hole on the port side.  I thought it was just a scratch until I applied a bit of pressure.  Another crack in the seat!!  


I Gorilla taped some additional foam to the underside of the seat, hoping to take up some of the gap below the seat and re-installed the seat...


I sent the pictures of the failed seat to the local outfitters, who in turn contacted Valley Canoe Products.  After a couple weeks I got word that the warranty would be honored and they would send me a new seat.  

I waited.  I waited some more.  No sign of a replacement seat was in sight and my Fortune Bay trip was coming up in the middle of July.  I really did not want to go on a week-long kayaking trip with a seat that was, for all intensive purposes, held together with tape, albeit Gorilla tape.  So I decided on another plan of action.  

I ordered a foam kayak seat ( http://shop.skinboats.com ) in hopes it would show up before the big trip.  It didn't... their new shipment of seats was late arriving.   Near the end of July the foam seat and the replacement seat from Valley arrived within a couple days of each other...

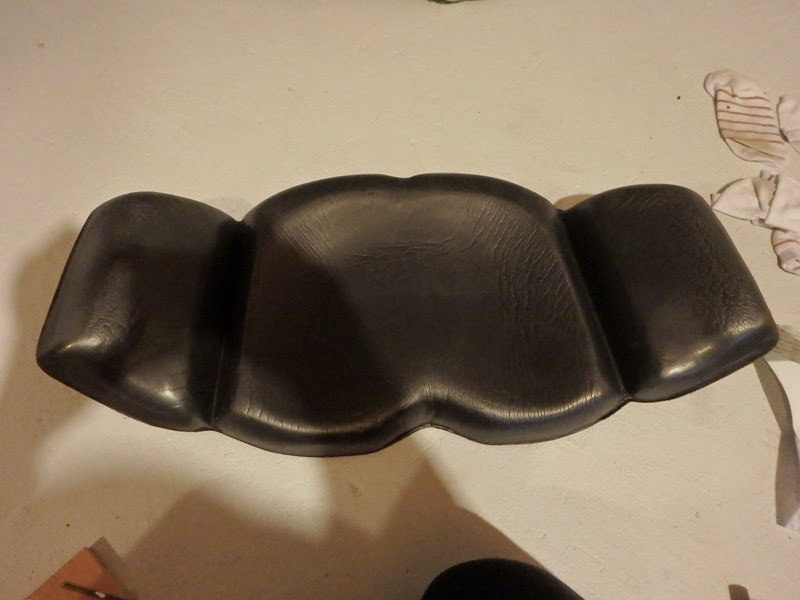
The foam seat

The replacement seat, which is exactly
like the one that was in the kayak

Now I had two seats. My initial thought was to install the replacement seat with some modifications to attempt to rectify the design flaw (reinforce the sides, more foam underneath...).  I could put the foam seat away and if, or more likely 'when', the replacement seat failed then the foam seat would be my back-up.  But then I decided to reverse my thinking...  I would install the foam seat (which is not hung, but instead attached directly to the bottom of the cockpit) and keep the replacement seat for a back-up.  I took the plan a step farther...

My paddling buddy, Sean, had told me that he had used industrial velcro to hold his home-made minicell kayak foam seat in place.  The advantage with velcro is that the seat can be re-positioned and can be removed to clean out dirt and grit that finds its way underneath the foam.  This made good sense to me.  

We did not paddle today... the weather was calling for thunder showers, which we did get, along with some lightening.  Due to the weather forecast we thought it prudent to stay off the water.  So today became the day to install the foam seat...

So off to the store to buy some velcro...


Both sides of the velcro has a sticky side with "superior holding power" to adhere the pieces in place, but I used Marine Goop in hopes to get a better bond... time will tell.

In my recreation room I adhered the fuzzy sided pieces of the velcro to the underside of the foam seat.  Two strips would probably be enough but I decided on three...


Then I made a paper template to use to help match up the locations of the non-fuzzy part of the velcro that would be adhered to the bottom of the cockpit...


I went out to my shed and marked the outline of the original seat (just for reference purposes) before removing it from Jenny...


I loose-fitted the foam seat for fit and got in.  I moved the foam around to a position that seemed to be comfortable to me...


... and marked the location of the foam seat...


Positioning the paper template, I marked the locations of the holes for the non-fuzzy velcro pieces...


There was a bit of water in the cockpit before I had started and I had sponged and wiped it all out.  I wanted to make sure things were good and dry so I put a heater in the cockpit for a while to make sure...


Once I was happy with the dryness of the cockpit, I 'gooped' in the non-fuzzy pieces of the velcro....


I did think about putting velcro on the hip pads of the foam seat, but they are attached to the seat and I can always add the velcro at a later date if need be.  I've read that some people cut them away from the seat bottom and adhere them in separately, but they seem to fit just fine attached to the seat. 

I detached the backband from the old seat and secured it in place using the deck bolts and plates that held in the Valley seat... 


A shot of the plate that is used to
hold up the original ABS seat


So now I have to wait for the Goop to cure.  The instructions say it takes 24 hours to dry and depending on the materials and conditions it could take 48 to 72 hours.  I think I will err on the side of caution and wait the 72 hours.  

Once the Goop has fully cured, then it is just a matter of putting the foam seat in and get on the water to see how things feel.  With the use of the velcro I'll be able to move the seat a little forward or back until it feels comfortable and adjust the backband as necessary.  

I'll also have the option to Goop the foam directly to bottom of the cockpit if the velcro does not hold once I find the most comfortable position for the seat that works best for me.  And if this whole foam seat replacement does not work out then I still have the option of installing the Valley replacement seat.

I'll do a post later on, after I have had sufficient paddling time to pass judgment on my velcro'd-in-place foam seat installation....