Continued from previous Post 43…
When I started my SOF Disko Bay kayak project I was only doing a little bit each weekend. But progress has been slow. After last weekend I decided I would do a little each night this past week to try to move things along and I have made some good progress.
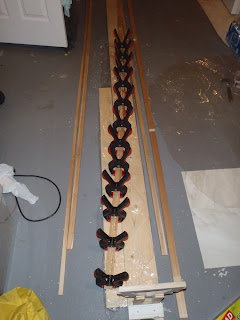
I decided to use the same method that Sean used for his Disko (I think he got it from Dave Gentry) for the upsweep of the bow and stern gunwales. You simply rip the 1.5 inch wide cedar into three strips with a handsaw and then glue them in the desired curvature. This was easier than I thought and works very well. I cut all the ends back about six feet and set up a little jig with a few nails on my strongback, glued (I used Gorilla Glue) and clamped.
This process took a few nights as I could only glue one end of each gunwale at a time. I am not sure if I will have too little or too much curve but now it will be whatever it will be… Hope it works out well, though.
The cockpit coaming will be made up of three layers of built-up plywood, a bottom ring, a spacer, and then the coaming lip. In the same manner as the templates I made for the frames, I made up templates for the cockpit coaming, one for the coaming lip (2 inches wide) and one for the spacer and the bottom ring (each one inch wide).
On one piece of 11.5 mm Russian Birch plywood I traced out the bottom ring (this piece will be attached to frames three and four before the skin goes on)...
On another piece of 11.5 mm Russian Birch plywood I traced out the coaming lip...
On one piece of 11.5 mm Russian Birch plywood I traced out the bottom ring (this piece will be attached to frames three and four before the skin goes on)...
On another piece of 11.5 mm Russian Birch plywood I traced out the coaming lip...
For the spacer I was able to use the 17.5 mm piece of plywood I had left over from which I cut my frames. I sized things up and I found that if I cut off one corner and glued the factory straight edges then it would be just big enough for the spacer ring. With the bottom ring and the coaming lip being full pieces I did not mind having joins in the spacer.
I set to work with my jig saw and cut out the three rings.
I was worried that the glued piece on the spacer might come apart with the vibration of the jigsaw but it held during cutting. Funny thing though… as I was hand sanding the rough edges one of the joins came apart. Perhaps there was just not enough glue or maybe I should have let it sit for the full 24 hours (I think I left it for about 18 hours when I cut it out). But if you look at the two joins you will see one is a diagonal joint (like a scarf joint) and the one that came apart is almost straight across the width of the ring… Anyway I decided to re-glue the join first before I glue the spacer to the coaming...
Oh yeah... I received my polyester fabric, artificial sinew, and the backband that I ordered a while back... it only took about 12 days to come from Kudzu Crafts in Alabama...


No comments:
Post a Comment