It appears to me that the problem with these particular seats is that they are made with ABS plastic and are 'hung' from the underside of the deck. The foam that is glued to the underside of the seat is not sufficient to make a solid connection with the bottom of the cockpit and the underside of the seat. When paddling, bracing, rolling, etc... the seat will flex and move, and the plastic will eventually fail at the points of greatest pressure.
However, knowing there was a seat design flaw, I ordered up North Cape Jenny anyway...
Valley provides a one year warranty on their products, and Jenny was to be in my possession one year on June 4th of this year. On the 17th of May I paddled. When I returned home I put Jenny in the shed and noticed a crack on the starboard side of the seat!! As expected, the Valley seat had failed, although I expected it to last longer.

I removed the seat to have a closer look and discovered that there were cracks on both sides...
 |
| Starboard side |
 |
| Port side |


While putting on the tape I noticed a line at the hole on the port side. I thought it was just a scratch until I applied a bit of pressure. Another crack in the seat!!

I Gorilla taped some additional foam to the underside of the seat, hoping to take up some of the gap below the seat and re-installed the seat...

I sent the pictures of the failed seat to the local outfitters, who in turn contacted Valley Canoe Products. After a couple weeks I got word that the warranty would be honored and they would send me a new seat.
I waited. I waited some more. No sign of a replacement seat was in sight and my Fortune Bay trip was coming up in the middle of July. I really did not want to go on a week-long kayaking trip with a seat that was, for all intensive purposes, held together with tape, albeit Gorilla tape. So I decided on another plan of action.
I ordered a foam kayak seat ( http://shop.skinboats.com ) in hopes it would show up before the big trip. It didn't... their new shipment of seats was late arriving. Near the end of July the foam seat and the replacement seat from Valley arrived within a couple days of each other...
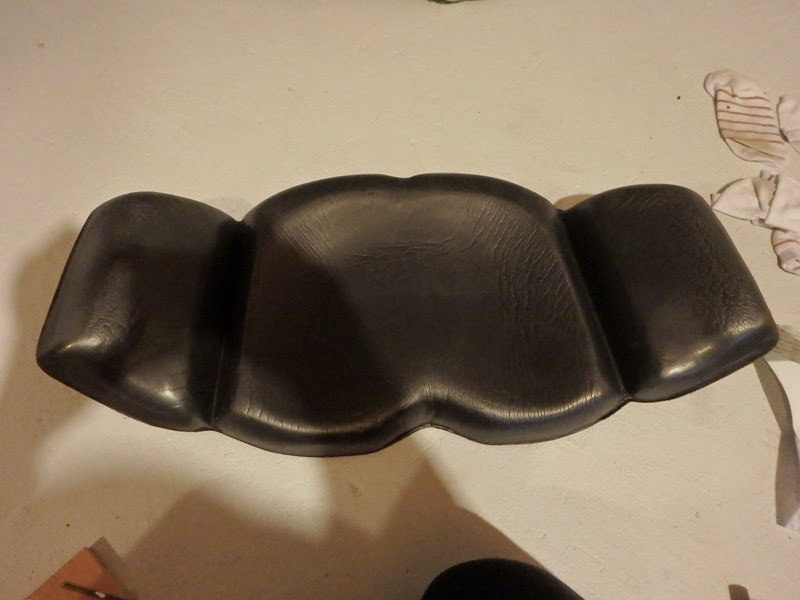 |
| The foam seat |
 |
| The replacement seat, which is exactly like the one that was in the kayak |
Now I had two seats. My initial thought was to install the replacement seat with some modifications to attempt to rectify the design flaw (reinforce the sides, more foam underneath...). I could put the foam seat away and if, or more likely 'when', the replacement seat failed then the foam seat would be my back-up. But then I decided to reverse my thinking... I would install the foam seat (which is not hung, but instead attached directly to the bottom of the cockpit) and keep the replacement seat for a back-up. I took the plan a step farther...
My paddling buddy, Sean, had told me that he had used industrial velcro to hold his home-made minicell kayak foam seat in place. The advantage with velcro is that the seat can be re-positioned and can be removed to clean out dirt and grit that finds its way underneath the foam. This made good sense to me.
We did not paddle today... the weather was calling for thunder showers, which we did get, along with some lightening. Due to the weather forecast we thought it prudent to stay off the water. So today became the day to install the foam seat...
So off to the store to buy some velcro...

Both sides of the velcro has a sticky side with "superior holding power" to adhere the pieces in place, but I used Marine Goop in hopes to get a better bond... time will tell.
In my recreation room I adhered the fuzzy sided pieces of the velcro to the underside of the foam seat. Two strips would probably be enough but I decided on three...

Then I made a paper template to use to help match up the locations of the non-fuzzy part of the velcro that would be adhered to the bottom of the cockpit...

I went out to my shed and marked the outline of the original seat (just for reference purposes) before removing it from Jenny...


... and marked the location of the foam seat...

Positioning the paper template, I marked the locations of the holes for the non-fuzzy velcro pieces...


There was a bit of water in the cockpit before I had started and I had sponged and wiped it all out. I wanted to make sure things were good and dry so I put a heater in the cockpit for a while to make sure...

Once I was happy with the dryness of the cockpit, I 'gooped' in the non-fuzzy pieces of the velcro....

I did think about putting velcro on the hip pads of the foam seat, but they are attached to the seat and I can always add the velcro at a later date if need be. I've read that some people cut them away from the seat bottom and adhere them in separately, but they seem to fit just fine attached to the seat.
I detached the backband from the old seat and secured it in place using the deck bolts and plates that held in the Valley seat...

 |
| A shot of the plate that is used to hold up the original ABS seat |
So now I have to wait for the Goop to cure. The instructions say it takes 24 hours to dry and depending on the materials and conditions it could take 48 to 72 hours. I think I will err on the side of caution and wait the 72 hours.
Once the Goop has fully cured, then it is just a matter of putting the foam seat in and get on the water to see how things feel. With the use of the velcro I'll be able to move the seat a little forward or back until it feels comfortable and adjust the backband as necessary.
I'll also have the option to Goop the foam directly to bottom of the cockpit if the velcro does not hold once I find the most comfortable position for the seat that works best for me. And if this whole foam seat replacement does not work out then I still have the option of installing the Valley replacement seat.
I'll do a post later on, after I have had sufficient paddling time to pass judgment on my velcro'd-in-place foam seat installation....
This comment has been removed by a blog administrator.
ReplyDeleteThis comment has been removed by the author.
ReplyDeleteThis comment has been removed by the author.
ReplyDeleteThis comment has been removed by the author.
ReplyDelete